Brief Introduction #
MooWoodle is a powerful yet easy-to-use WordPress plugin that connects your Moodle™ LMS with WooCommerce. It allows you to sell Moodle courses directly from your WordPress store. Once a customer purchases a course through WooCommerce, they are automatically enrolled in Moodle, no manual effort required.
Whether you’re running an online academy, a corporate training platform, or a solo e-learning business, MooWoodle simplifies your course selling process while ensuring smooth user enrollment.
Features #
- Course Integration (Moodle → WordPress)
- User Enrollment & Sync
- Basic User Synchronization
- Course Listing via WooCommerce
- One-click Course Synchronization
- Flexible Subscription Plans (Using WooCommerce Subscription plugin) [PRO]
- Single Sign-On (SSO) [PRO]
- Advanced Course Filtering [PRO]
- Bulk Course Synchronization & Management [PRO]
- Flexible Pricing Models (including subscriptions and variations) [PRO]
- Classroom Enrollment – Enroll Multiple Users with One Purchase [PRO]
- Gift a Course to Someone Else [PRO]
- Course Bundles [PRO]
- Sync Course ID as Product SKU [PRO]
- Sync Moodle Course Images [PRO]
- Enrollment Logs and Management Dashboard [PRO]
Step 1: Moodle Configuration #
Before syncing with WordPress, you must configure your Moodle site for secure data exchange.
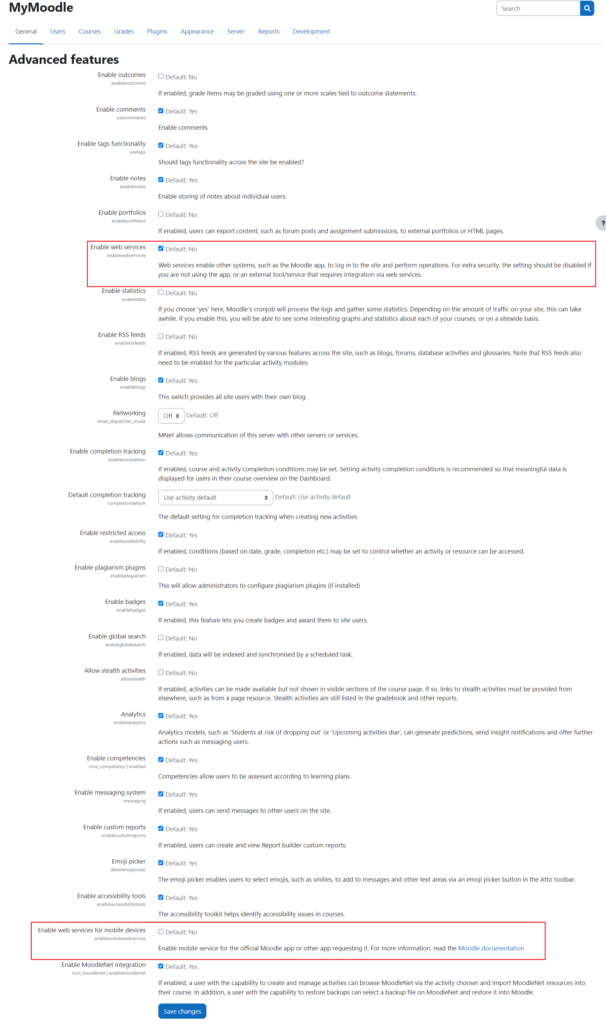
Enable Web Services #
Moodle disables web services by default. Enable it to allow communication between Moodle and MooWoodle.
- Go to Moodle Dashboard → Site Administration → Advanced Features
- Enable:
Enable web servicesEnable mobile web services
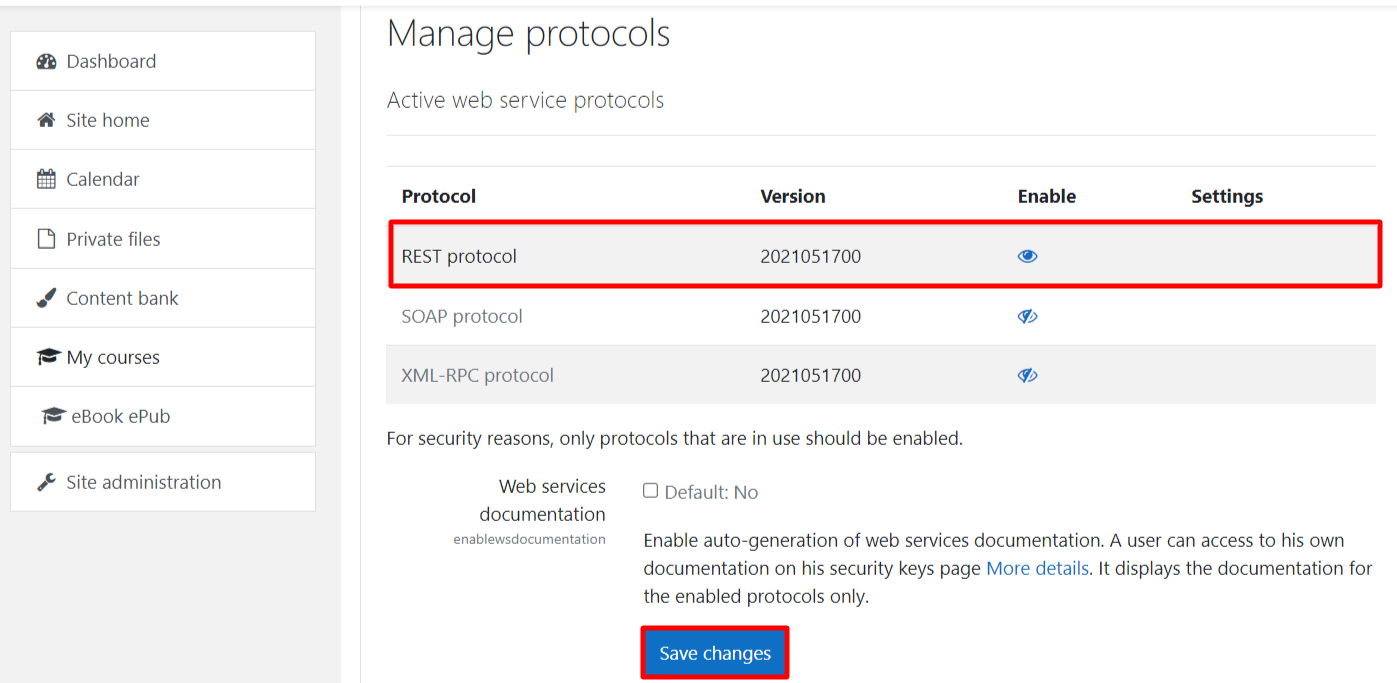
Enable REST Protocol #
Managing Protocols links one website to another. In this case, we just need to enable the REST protocol. Requirements for easily completing this process is given below.
Navigate to Site Administration → Server → Web Services → Manage protocols
Enable the REST protocol by clicking the eye icon
Create External Service #
Configuring the External Service involves integrating functions into Moodle that open up communication channels with WordPress. This simplifies the process of transferring course data, ensuring a smoother experience.
To start the configuration of the external service let us take a look at the steps given below –
- Go to Site Administration → Server → Web Services → External Services
- Under Custom Services, click Add and name it
MooWoodle - Enable:
Can download filesCan upload files
- Do not enable “Authorised users only”

- Add The Following Required Functions :
| Sl.No. | Codes | Functions |
|---|---|---|
| 1 | core_webservice_get_site_info | Return some site info / user info / list web service functions |
| 2 | core_course_get_categories | Categories will be available once this code is added |
| 3 | core_course_get_courses_by_field | This code is required to enroll new users. |
| 4 | core_course_get_courses | Clients can get courses by adding this course |
| 5 | core_user_get_users | Using this code the client can search for users meeting the parameters |
| 6 | core_user_create_users | This code will help in creating users |
| 7 | core_user_update_users | With the help of this code, the client can update his/her users |
| 8 | core_user_delete_users | Delete users. |
| 9 | enrol_manual_enrol_users | This code is required to enrol new users. |
| 10 | enrol_manual_unenrol_users | This code is required to enroll new users. |
- Return to the new service and add the following functions:
Access Token Setup #
To connect Moodle with MooWoodle, you’ll need to generate an Access Token. Here’s how to do it:
- Step-by-Step Guide
Log in to Moodle as Admin.
Navigate to:Site administration→Server→Web services→ Manage tokens
On the Manage tokens page, click Create token. - On the “Create Token” Page, Fill in the Following:
User: Select the admin account or the user who will manage the Moodle connection.
Service: Choose the external service you previously created for MooWoodle.
IP Restriction (Optional): Leave blank unless you want to limit token usage to a specific IP address.
Valid Until (Optional): Set an expiration date for the token if needed, or leave it blank to keep it always active.
Once all fields are filled, click Save changes.
You’ll be redirected back to the Manage tokens page. Here, your Access Token will be listed. - Final Step
Copy the generated token and paste it into the MooWoodle settings page on your WordPress dashboard.
MooWoodle Configuration (WordPress) #
When you successfully configure Moodle, the next part is the configuration of WordPress.
The configuration of WordPress comes under 4 Sections :
Settings #
The settings tab primarily serves the purpose of linking your WordPress site with your Moodle site. To streamline this connection process, we’ve divided it into four distinct sections:
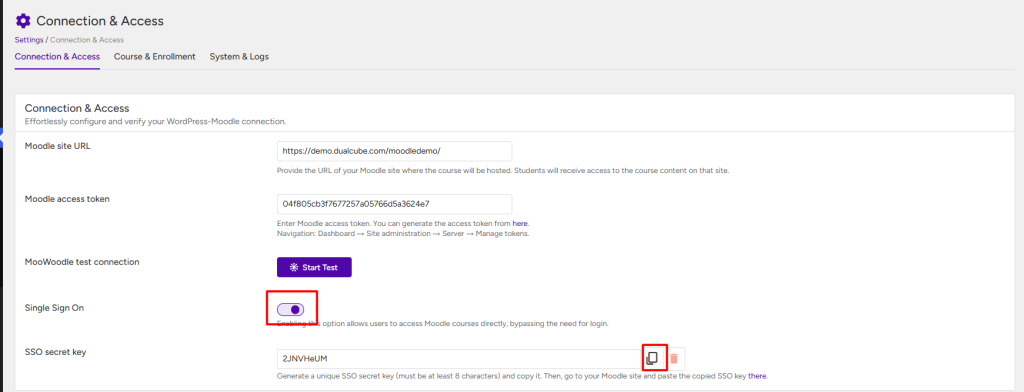
Connection & Access #
In this section, you’ll establish the connection between Moodle and WordPress using the following tabs:
- Moodle Site URL: Here, you’ll enter the Moodle site URL, which our plugin will use to retrieve course data.
- Moodle Access Token: To enable the connection with Moodle, a token is required. You can learn how to create token from here. Alternatively, you can simply log into your Moodle site and go to Dashboard => Site Administration => Server => Web Services => Manage Tokens. Copy the token from your Moodle site and paste it here.
- Test Connection: This handy option allows you to verify whether your WordPress site is successfully connected to Moodle. If any configuration issues arise, you can access the log button for detailed information on why the connection may not have been established correctly.
- SSO [Pro] : Experience seamless login and logout synchronization between your Moodle™ software and WordPress platforms. Discover how this automated process can save you time and eliminate login-related hassles for both you and your learners. This feature is available in MooWoodle Pro.To know more on how this works – https://dualcube.com/docs/moowoodle-moodle-connector/#5-toc-title
Course & Enrollment #
The configuration of the Display tab lets you decide about what and where your wish to present your courses. These details make it easier for your learners to know more about your courses.

Classroom Mode / Group Purchase #
Allow buyers (e.g., teachers or managers) to purchase multiple seats for a course / Cohort/Group and assign those seats to users from their WordPress account. Each assigned user is automatically enrolled into the corresponding Moodle cohort.

Seat Reassignment #
Buyers can reassign seats by removing a previously added user and enrolling someone new. Perfect for rotating student groups or evolving team structures.
Gift Someone [PRO] #
Enable customers to purchase a Moodle course as a gift. During checkout, they can enter the recipient’s name and email. MooWoodle will handle sending access credentials and course enrollment.
#
System & Logs #
- Advance Log: Enabling advanced log settings allows the system to record and store detailed error information and advanced diagnostic data. This helps in capturing and storing comprehensive error-related information for further analysis and troubleshooting.
- Connection timeout: When WordPress attempts to establish communication with Moodle, there is a possibility that the time taken for this communication exceeds the server’s configured timeout settings. To address this situation, we provide you with the option to adjust the timeout settings as needed.
- Automatic synchronization frequency: The automatic synchronization frequency determines how often user data will be updated between WordPress and Moodle. By default, this synchronization process runs every 5 minutes, ensuring that any changes to user data are promptly reflected across both platforms.
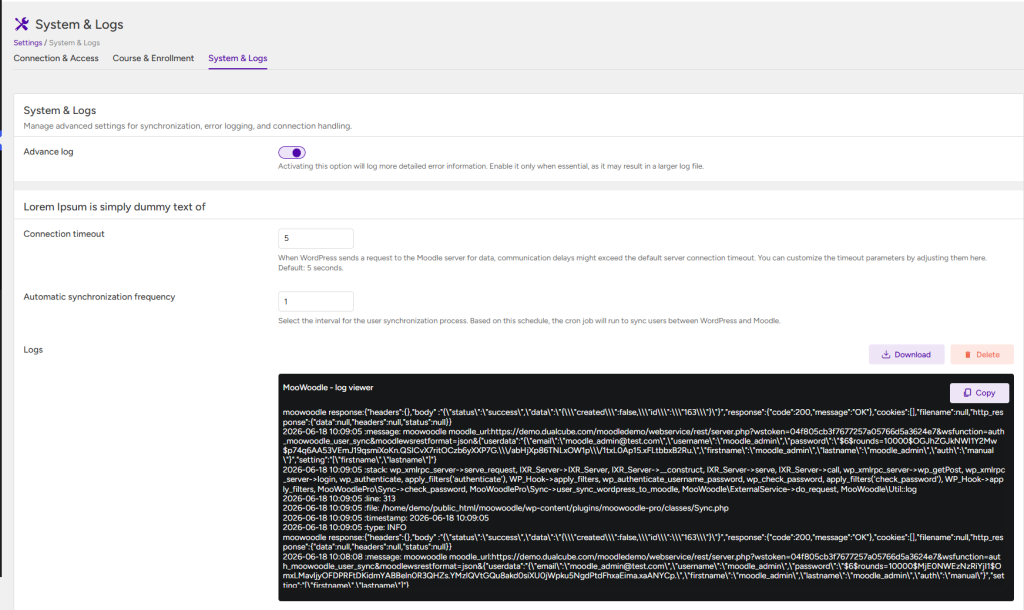
Log #
The “Log” option serves as a valuable tool for troubleshooting any connectivity issues between your store and Moodle. It offers a wealth of information and tools to help you pinpoint the root cause of your store’s inability to connect with Moodle. This enables you to identify the necessary changes needed for a successful resolution.
Synchronization #
You will find the “Course Synchronization” option under Synchronization tab. One of the prime tasks of this bridge is to synchronize your Moodle data with that of WordPress. This way you don’t have to worry about transferring data back and forth. To simplify the synchronization process, we have divided this into 3 parts:
Course #
The All Courses section gives the admin a list of all courses in the site. In this page admin can see the following options for each product :
- Course Name
- Short Name
- Product Name of that course
- Category
- Enrolled student number
- The date of the course added
- Action gives admin the option to Sync the following data for each courses (Available in Pro)
- Sync Course Data
- Sync Course Data & Update Product
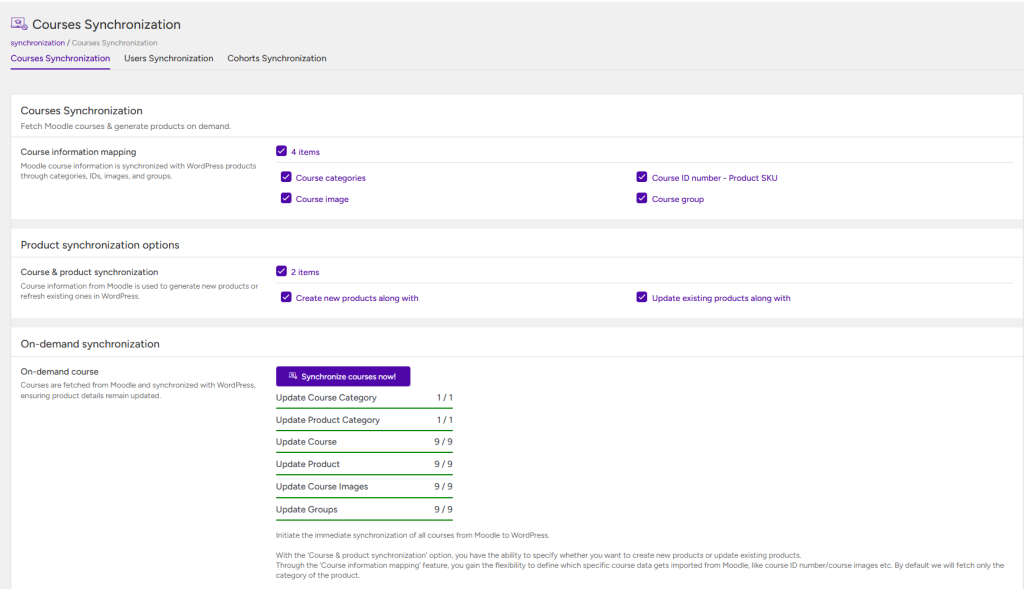
- Course information mapping : Select which information of the course will be synced with the product. Admin can choose any option from the following :
- Course Categories: Similar to the previous settings, enabling this option will let you synchronize your moodle course categories with that of WordPress. So, if you are selling more than one course of two different categories that too would be available to your users.
- Course ID number (Pro) – Product SKU (Pro) : This sets course’s ID as Product’s SKU.
- Course image (Pro) : This option will fetch images of the courses from Moodle to WordPress products.
- Course & product synchronization
- Create new products along with: If you’ve added new courses in Moodle and want to create products only for them, select this option. When you click on “Synchronize courses now”, then it will create new products.
- Update existing products along with: If you have edited any courses in Moodle, then the “Synchronize courses now” option will update only existing products in your site.
- Synchronize courses now!
Start the immediate synchronization of all courses from Moodle to WordPress.
The ‘Course & Product Synchronization’ option allows you to choose whether to create new products or update existing ones. With the ‘Course Information Mapping’ feature, you can specify which course details to import from Moodle, such as course IDs or images. By default, only the product category will be imported.
With MooWoodle Pro, you can sync the course ID as the product SKU and use the course image as the product image in WordPress.
User Synchronization [PRO] #
As discussed MooWoodle is the bridge that connects Moodle to WordPress and WooCommerce. This synchronizes all users from Moodle to WordPress & WordPress to Moodle depending on “Synchronization flow between sites”.

Cohort [PRO] #
The All Cohort section gives the admin a list of all courses in the site. In this page admin can see the following options for each Cohort:
- Cohort Name
- Product Name of that cohort
- Enrolled student number
- Action gives admin the option to Sync the following data for each courses (Available in Pro)
- Sync Cohort Data
- Sync Cohort Data & Update Product
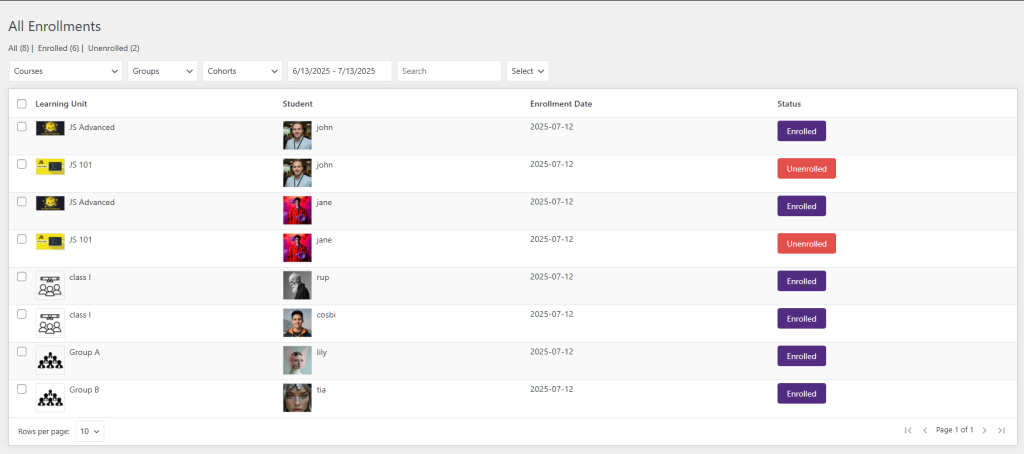
Enrolments (Pro) #
All Enrollments” option displays a list of users enrolled in your courses. On this page, you’ll find the following information about the students.
WorkFlow #
With this, we come to the end of our tutorial. We hope this tutorial will help you sell and educate people willing to learn your expertise.


